

How To Change Server Logo On Minecraft

Listing of content you will read in this article:
- one. How to change Minecraft server icon?
- 2. How to create a custom server icon?
- 3. Conclusion
In Minecraft, an attractive server icon puts a corking impact on other players and makes you wait more professional.
In that location are a lot of plausible options in terms of Minecraft server icons. You can easily add an icon, create an icon, or even change a custom icon.
This article will solve your ambiguities and help you in dealing with Minecraft server icons.
Let us understand the article in a step-by-step way.
Earlier starting the process, you lot must visit the official website of Minecraft and download the Minecraft Server JAR. In case y'all use a server host, you have to log in to the server dashboard first. After that, utilise FTP to conclude the task of changing an icon.
How to change Minecraft server icon?
- Select the desired image for setting upwardly your server icon. You have several options, either search for an image on Google or create your own icon.
- At that place is a particular specification for the icon size that is, 64x64 pixels. Moreover, the file blazon should be PNG. In case, the image extension is not PNG, you can resize it or convert your prototype by several online tools available.
- One time you have fulfilled these basic atmospheric condition, the adjacent step is to rename the icon file to server-icon.
- At present, the adjacent stride is to merely move this image to your server's main folder.
- Merely restart the server and take a look at the multiplayer server list.
Congratulations! Hither is your make-new server icon.
In the futurity, if yous ever wish to modify this icon again, you can merely bandy the server-icon.png prototype with whatever epitome that yous want.
Additionally, in that location can be a situation where you wish to create a custom server icon. To achieve this task, you have to perform some simple steps. Let's begin.
How to create a custom server icon?
The process to create a custom server icon is extremely piece of cake.
The first step is to open Photoshop. Then click on File followed by New.
Moving on, fix the width and height as 64 pixels as it is the standard specification.
At present, the resolution has to be set up to 72 pixels/inch.
Click on Create. A blank square appears on your screen as shown beneath.
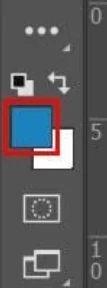
Choose any groundwork color according to your ain wish. At present, unlock the background past borer on the lock icon as depicted below.
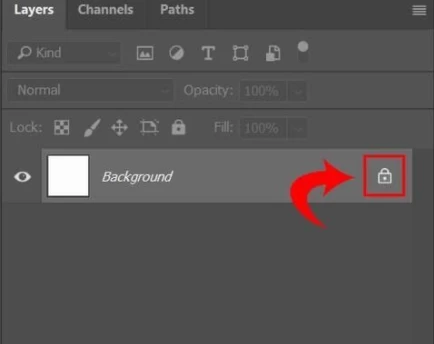
Moving a step further, press Alt + Delete. This fills your background with the colour that yous select.

Now, in that location are a lot of features that can exist implemented as well every bit customizations that can be done.
Take a wait.
Y'all can add a stripe in the center of the icon. For instance, yous can choose a darker colour than blue and add a layer afterwards - Shift + Ctrl + Northward.
Now, select the Rectangular Marquee Tool (M). Drag to make a rectangle.
Press Alt + Delete. It fills the rectangle with any colour that you desire. To release the rectangle, printing Ctrl + D.

Moreover, you lot can also add together a slope effect to the icon. For that, you have to insert another layer. Again press Shift + Ctrl + Due north. Further, select the Gradient tool.
Now, select white colour, and re-create the settings for the Slope tool located in the pinnacle left.
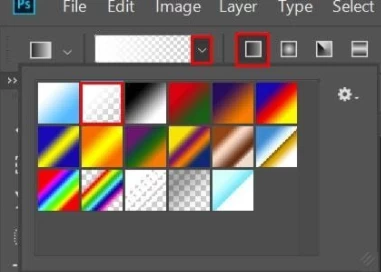
Further, yous take to drag your cursor from meridian to bottom of the icon. That's information technology. Y'all volition see a white fading gradient on the icon.
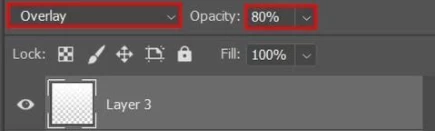
You can as well make boosted changes like setting the layer iii blend mode to Overlay. Subsequently, opacity to 80%.
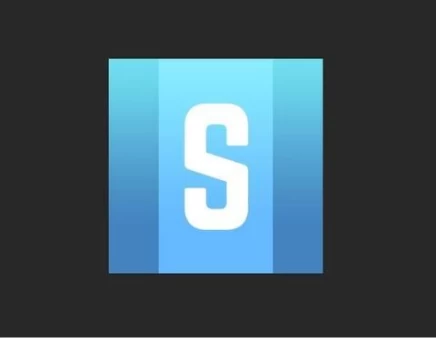
This is how your icon looks now!

As the groundwork is completely fix, yous tin can add any text that you want!
Go to the Horizontal Type Tool and click on the middle of your screen. Type your text.
As an example, here is a snapshot.
Voila! Your server icon is set up.
These were some of the bones styling ideas. There are aplenty options bachelor for y'all. Yous can explore and land on different styles that adjust you. Moving on, yous must save your cosmos. To do that, go to File, Salvage As. Save the piece of work with the proper name server-icon and in PNG extension. That's it. You are done.
Conclusion
We hope that this commodity solves your ambiguities and helps y'all to understand the procedure to modify and create Minecraft server icons.
Proceed exploring, keep grinding!
Source: https://monovm.com/blog/how-to-change-minecraft-server-icon/
Posted by: desrochersponoulace.blogspot.com
0 Response to "How To Change Server Logo On Minecraft"
Post a Comment